Sunday, 1 November 2015

Cockatoo Island

We took the ferry to Cockatoo Island. I'd checked out their website so knew it was both a former prison and building yard; that you could camp there and that there were trails to follow. Beyond that it was going to be a surprise. It turned out to be good Sunday afternoon adventure with the kids.

We started at the Visitors Centre and collected a free kids trail booklet (2 trails available). We decided to try the Ship Shape Trail and set off past the campsite looking for the first clue, which we walked right past and then spent ages doubling back to find it. We are quite seasoned at treasure hunts but found this so hard we finished without finding all the clues. We asked back at the visitors centre where the final clue was and they didn't know either. It didn't spoil anything. For a disused complex there is a lot to see. 
We went through tunnels; around the big machinery; stopped at one of the cafes; Stepped into the confinement cells; Warning - we got chased by swooping seagulls who were protecting their nests, even though we didn't walk close to them. We ended our day with a game of giant chess while waiting for the ferry back.

If you are interested in history or machinery then it should definitely be on your list of places to visit. If you just want to occupy the kids for a few hours then it ticks that box too.   

Monday, 19 October 2015

Gold Coast

Our long weekend away at Surfers Paradise on the Gold Coast. 

I'd heard mixed comments about the Gold Coast ranging from 'it's paradise' to 'tacky teen hang out' but went with an open mind and a suitcase full of swimwear.  Maybe it's because we're expats and haven't visited many coastal spots, or because it was only our second weekend away, either way, I was definitely leaning towards the positive end of those comments. 
The QT hotel was a good start. Greeted in reception with a drinks table serving iced tea and lemonade; The promise of a dip in the hot tub and pool; Flip-flops (thongs) in the room instead of slippers; and a welcome surf board platter of chocs and macaroons.

We were located towards the northern end of Surfers Paradise beach so a short walk away from the hub and therefore away from the hustle and bustle. Waves were big and, paying attention to the flags and in view of the lifeguard tower, we spent time jumping them and trying to stay on our feet. 

We experienced the two extremes of entertainment - the theme park and the places to go for free, spending time at the beach and the Rockpools play park. 

The Rockpools was a fantastic area for the kids and we could've spent every day there.
When we arrived there was a small festival in the grass area with free bouncy castles, stalls and information stands. The wet play area was a long strip of land with various shallow pools, fountains and a lifeguard. Next to it is a cafe and toilet/shower block.

The other side of the green there is a giant shaded jumping area.

Next to that is the playground.
It was circled by a track on which you could cycle the fixed bikes round. If you brought your own bikes or scooters you could tackle the little bike course.  All of these activities run parallel to the shoreline. Out in the bay there is a giant inflatable course. There's also a disabled wheelchair swing. 

There were several theme parks to choose from: Seaworld; Warner Bros Movie World; Magic Mountain; Wet nWild; For our big family day out we chose to go to Dreamworld, which included Whitewater World.  Check out our Dreamworld adventure here

On our last afternoon we jumped on the Quack-r-Duck Tours which was a way to spend our last couple of hours before heading to the airport that didn't involve getting wet, sandy or shopping. It was an interesting tour by a funny driver who drove us parallel to Main Beach, past Seaworld and out onto Broadwater, around all the multi-million$ homes of Paradise Waters and back onto the temporary V8 Supercar race track.  My son got to drive for a bit and steered us across Broadwater without bumping into any other boats. 

Gold Coast is a good holiday destination. We only saw a small percent of the area and would happily go back for a weeks holiday. I can't see us living there. There seemed to be a good work/life balance judging from all the people we spoke to there (mainly hotel staff and taxi drivers). Most of which hadn't grown up in the Gold Coast but had moved there for the sunshine and more laid back life. 


Tiger Island at Dreamworld
 Fun in the waves
Beach Vs Buildings

The area where Pirates of the Caribbean is filmed


Amsterdam School Trips

Apple Picking
A short coach journey led us to the orchard for apple picking. We learnt how to look for the heart when you cut an apple in half and then got to pick a carrier bag full and weigh them.

At home I made my first apple cake which actually tasted pretty good, especially as I was translating the instructions as I went.


Ice Skating in the Rain
Ice Skating is a firm favourite in Amsterdam with outdoor rinks open from around November to February time. Usually a lot of fun, Unfortunately, on the day of our school trip it not only rained non stop but it was freezing cold. The ice was slushy and wet and extra slippery. Kids were falling over and getting soaked before getting near the ice. There were tears and soggy socks.

Wet Seaside Fun
Another rainy and windy trip but it didn't stop the kids having fun running along the beach searching for shells and jellyfish. A round of hot chocolate was added to the itinerary when fingers started to go blue.

Circus Tricks
The big winner in the chart of school trips. Fun and indoors! Kids learned how to walk the tightrope (and I got to have a go too), balance on giant balls, spin plates, juggle, ride clown bikes etc. with a bit of yoga to wind down. I saw every single child laugh during this trip, even the more shy children seemed to come out of their shell. It was wonderful to watch.

Hand holding

So we're now at that stage with my 7 year old that he'll voluntarily hold my hand walking to school, until we can see the school gates at which point he drops my hand (and my heart). Yet when I pick him up, he'll happily hold my hand walking out through the playground. Plus he knows he won't get a snack unless I have a greeting hug first! Why the before and after school change of heart?

Painted Macaroon dish


My best friend has mastered the art of baking macaroons so when I found this macaroon dish I brought it for her. I wanted her to think of me whenever she used it so decided to decorate it.
Luckily we still had some ceramic paint left from the kids 'mug decorating kit' which was ample.

The stick person was a bit of a mistake but I was pleased with how the macaroons looked. Just need the real think to taste now. 

Here's some she prepared earlier!

And these below, the first to be served in the new dish. They didn't last long. 

Sunday, 20 September 2015

Rubbish table refurb

A bargain garden furniture restoration. I rescued this table from the street on rubbish collection day. Using the leftover paint from the garden chairs it hasn't cost me anything to restore other than my time.

I started with sanding it down but stopped because in some parts it was only the rust holding it altogether and had many holes.

I would've preferred to separate the top from the legs but the nuts and bolts were too rusted to move. It did make it a bit messy when I was painting. 

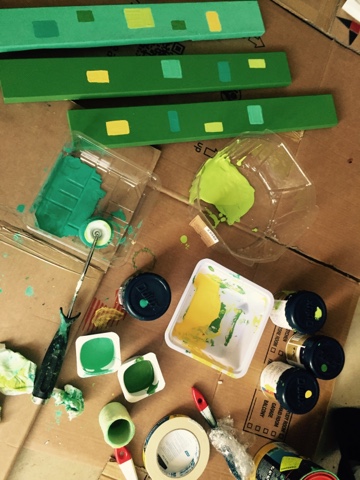
I was inspired by the tiles around the pool area so introduced little squares as decoration. Using masking tape to try and get straight lines. Some worked, some didn't - the paint seeped through, but overall does add a good splash of colour

The glass top was a mess, as was my trying to paint the top of the legs, so I decided to paint the underneath of the table. 


Equipment used:
Wire brush; sander; soap and water; outdoor paint; paintbrush; masking tape

Garden Bench & Chair Restoration

My big winter purchase of a set of secondhand benches and chairs has led to my first big restoration project and a timeframe of finishing before the summer sun comes.
I hope I have everything I need. I had to buy a lot of tools but if I deduct the cost of these (as I'll be using them in the future), then the expenditure wasn't too much. 

Prep work: Santity check with my design guru Gorgeous David. I searched Pinterest for similar projects, decided on which elements I was going to try from those. Wrote a list of supplies I needed. I went to Bunnings DIY store with a long list. The staff were really helpful and showed me alternatives to cut out some of the layers/process. Then back home and waited for a dry and child free day to get started. 

Step 1: Wash down the chairs

Step 2: Christen the wire brush with a lot of muscle, scrubbing the rust off the wrought iron framework. Using wire wool to get inbetween the curvy bits. Finish with electric sander to make it nice and smooth. 

Step 3: Wash wrought iron framework with soapy water and hose off

Step 4: Disassemble the wood slates from the frame. I thought this would be the easy bit but it turned out to be the most frustrating and time consuming as the rusty screws weren't moving a notch and eventual the screw head rubbed away. First I tried WD40 then more muscle power. In the end I had to saw through the screws with a hacksaw. 


Step 5: Sand the wooden slates then give up after deciding the wood wasn't good enough so I added Step 5A.

Step 5A: Buy replacement wood. A good decision as the wood was cheap and had a lovely natural pattern to it. I got it cut to size to save me time. 

Step 6: Paint the frames, let them dry over night before turning over to do the other side. 

Step 7: Paint wooden planks.

Step 8: Wash down frame to remove any stickiness from the iron paint.


Step 9: Put it all back together.

Step 10: Sit back with a glass and enjoy the newly renovated seat.

Top Tips I picked up from Pinterest and from my own mistakes:
- Ask for advice in your DIY store, I got some great help from mine, including free help fixing my jammed electric screwdriver.
- Take photos of every stage as you take the chair apart. Even if it only has a few parts it's easy to get it wrong when you put it back together.
- Put an elastic band cross your paint can to take the drops, helps keep the rim of the can clear of paint
- Take a photo of your paint can before you get it covered in paint so you can read the instructions and have the full details should you need more of the same paint.
- Wrap your paint brushes in clingfilm between coats
- If you get rusty nails that aren't budging you can screw through them with an electric screwdriver, or just cut right through them.
- Paint the underneath first so that when you turn it over to paint the top, the final drips will be on the bottom.
- I don't have a proper workshop so used empty plastic milk bottles to prop the frame up while I painted it so i could reach all the curves. 
And the first bench is finished, inspired by Sydney beaches with sand, green spaces and clear blue water 


The second bench is finished. I managed to save most of the original wood and decided on a tree design On one side.